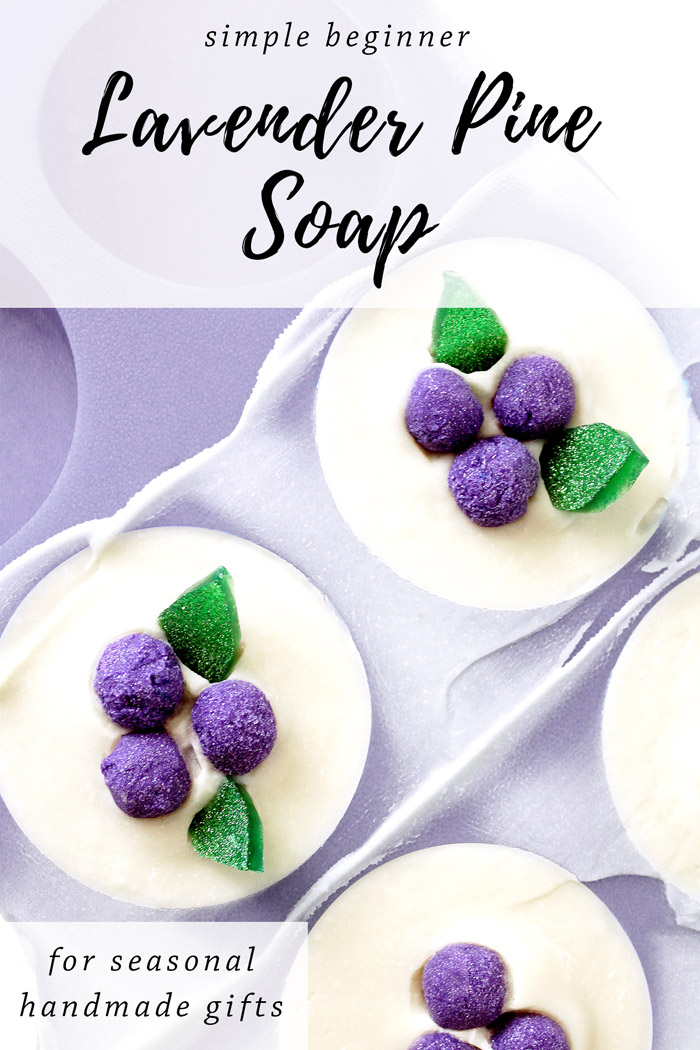
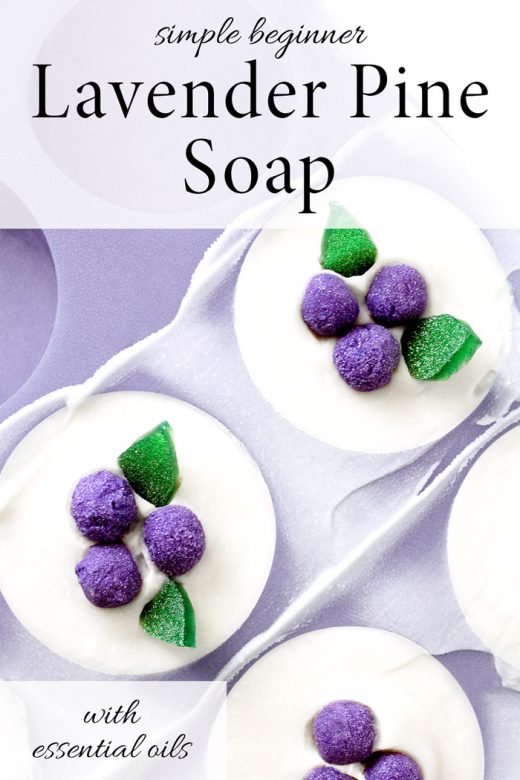
This simple basic soap recipe from guest blogger, Rebecca D. Dillon of Soap Deli News, is perfect for beginners. Formulated using just four natural carrier oils, this easy homemade cold process soap recipe is wonderful for all skin types, including sensitive skin. This recipe is also ideal for seasonal gifting for the holidays and beyond!
It’s amazing how fast the holiday season can sneak up on you. Between work, kids and just day to day activities our lives can be chaotic. So when you suddenly realize December is right around the corner, it can feel overwhelming trying to manage all of the extra tasks that come with the season.
Holiday gifts, however, don’t have to be a challenge. With soapmaking, all you need is an hour or two to create handmade gifts for your friends and family. It’s also a great way to naturally care for your skin throughout winter.
I first started using handmade soaps when I was in college. I’d always struggled with dry skin and, at times, eczema as well. When I discovered handmade soap that was a turning point in my life. Not only did I start seeking out other natural alternatives to commercial products, but I started making my own handmade soaps as well.
In the beginning I was just thrilled to simply say goodbye to dry, itchy skin. Now I enjoy soapmaking not only as a hobby, but as a way of life.
At the end of the day, however, what I really love is turning people on to handmade soaps – and teaching them how to make their own! Soapmaking really is quite addictive.
Back when I used to sell my handmade soaps on the farmers market, everyone would joke that handmade soap was like crack. While not quite the similarity I was going for, it’s also kind of true.
There’s just something about being able to make something that’s both functional and fun. (Even if you hated chemistry as much as I did in high school.)
I know a lot of people who have wanted to make cold process soap but are afraid to try. I was terrified about the prospect of working with lye at the beginning of my soapmaking journey as well. However, the one thing I can tell you, is that I wish I’d started making soap sooner.
It’s sometimes easy to feel trepidation about the unknown. I let that fear keep me from trying cold process soapmaking for some time. Conquering that fear was very much worth the result.
If you’re still wary about the making soap for the first time, you can watch video tutorials on YouTube to get a feel for the soapmaking process ahead of time.
I created the following basic soap recipe especially for first time soapmakers. I developed this recipe not only to simplify the process, but also to save on start up costs.
Depending on your budget, you can further customize this easy cold process soap recipe with natural essential oils for fragrance. Or try adding clay to give your soaps a creamier texture.
While you can create a great basic handmade soap with as few as one carrier oil, the extra oils in this recipe bump up the lather without sacrificing its skin conditioning properties.
I even share how to add decorative embeds to the tops of your soaps at the end of this post. So your second batch of soap is extra beautiful for those handmade holiday gifts.
Simple Basic Soap Recipe
Ingredients:
100 grams/3.2 oz. babassu oil (20%)
50 grams/1.6 oz. castor oil (10%)
25 grams/.8 oz. coconut oil (5%)
325 grams/10.4 oz. pomace olive oil (65%)
152.5 grams/4.8 fluid oz. distilled water (30.5% of the oil weight)
67.7 grams/2.15 oz. food grade sodium hydroxide (6% superfat)
7 grams/.25 oz. lavender essential oil, optional
7 grams/.25 oz. fir needle essential oil, optional
Getting Started:
For your convenience, I’ve included the percentage of each carrier oil, as well as the percentage of water and superfat used for my simple soap recipe. This will enable you to easily resize the recipe as needed once you’re more familiar with the soapmaking process. In the meantime, if this is your very first time making cold process soap, there are a few guidelines you should follow for safety reasons.
Safety Tips & Precautions:
As you are working with sodium hydroxide, also known as lye, it’s important to protect yourself from burns as well as dangerous chemical interactions. Therefore there are safety precautions you should take to minimize your risk of harm.
- Always use non-aluminum utensils and containers for mixing lye and blending soap. If you mix aluminum and sodium hydroxide, you get highly toxic hydrogen gas. I’ve seen this reaction and it’s definitely NOT one you want to repeat. If you’re cooking your soap on the stove, I recommend using a stainless steel pot. Likewise you’ll need a heat safe pitcher or container to mix your lye-water in as well as to weigh out ingredients.
- It’s also important to protect your eyes and skin. Occasionally there are accidents beyond our control. Sometimes soap splashes. While a lye burn from a splash feels like a bee sting, it’s not something you want in your eye or over a large area of your body. Therefore you should wear goggles, long sleeves and gloves when mixing your lye with water as well as during the soapmaking process.
- When you mix lye with water it lets off fumes. So you may want to mix your lye with water outside. If this isn’t possible, no biggie. I simply turn on the exhaust fan above the stovetop and mix my lye-water there. You want to wear a respirator mask, however, if you’re especially sensitive to chemicals.
- Always always always pour your lye into your container of water, not the other way around, to mix the two together. Doing it in reverse can cause the lye to volcano. You don’t want that. Trust me. It makes a mess. It’s a little scary.
- Pets and small children should shooed from your workspace when making cold process soap. They’re curious. Things spill and I wouldn’t want anyone to get burned or hurt by ingesting something that’s not safe. (I know. I make it sound sort of scary. But honestly, you’re probably more likely to get burned cooking than soapmaking. Just use common sense and you’ll be fine.)
Additional Tools & Materials:
In addition to the ingredients for this easy soap recipe, you’ll also need some basic kitchen tools and supplies.
- I like to use a silicone mold for making soap. While I started out using wooden loaf molds that my dad made for me, I’ve fallen in love with silicone molds. They make it easy to create cool shapes and eliminate the need to cut your soap into bars. Plus there’s no need to line silicone molds to keep the soap from sticking. In addition, my old wooden molds made 3 lbs. of soap, while most of my silicone molds hold a 1 lb. batch. So it’s easy to make as much, or as little, as you like depending on your needs.
- Gone are the days of hand stirring soap for hours at a time. We now have immersion blenders (aka stick blenders!) You don’t need to buy an expensive or fancy immersion blender for making soap. However, I do suggest you buy one with a removable stainless steel bottom for ease of cleaning. (Plus most of them now come with additional, super handy attachments. I’ve used the whisk attachment previously to make small batches of anti-aging cream.)
- You need at least three or four containers for making my basic soap recipe. One to hold the water, one to weigh the lye, one for your soapmaking fats and another for your fragrance or essential oils. If you’re wanting to mix your soap on the stovetop, you’ll need a stainless steel pot. Otherwise, you’ll need heat safe containers that are either plastic or glass and rated for high heat. I’m old school, and impatient, so I still use Pyrex measuring cups for everything. I melt my oils in the large 8 cup Pyrex bowl at 30% in the microwave, rather than on the stove, then mix my soap in the same container. This works great for small batches of soap including my basic soap recipe. However, there is some issue with the newer Pyrex not being up to snuff and there have been incidents of glass exploding. Therefore I highly caution you if you make a lot of soap to carefully check your glassware prior to each use to look for signs of etching. Any glassware with etching should no longer be used for soapmaking.
- Utensils! You’ll need a non-aluminum utensil to stir your the lye into the water. You’ll also want a spatula for getting the last of the soap batter out of your container and into the mold. It’s also handy for smoothing out the tops of your soap once poured.
- You will also need a digital scale to weigh out the majority of ingredients. Liquid measurements for anything but the water in my basic soap recipe can result in a failed batch of soap.
- A digital thermometer is also needed to ensure you mix your soap at the right temperature. Mixing your soap too hot can cause the middles to crack.
- I also recommend having a cutting board on hand. Simply place your soap mold onto the cutting board before your pour. That way you can easily transport your soap to a safe location (free of prying noses) if needed.
- Finally, plastic film or parchment paper is also handy. I typically use this to further smooth out the tops of soap as well as to insulate the bars. However, as I did add decorative soap embeds to the top of these soaps, I skipped this step.
Instructions:
Once you have your ingredients and materials, you’re ready to get started on my simple soap recipe! Don’t forget to take the safety precautions mentioned previously as you work through the soapmaking process. (If you’d like more in-depth instruction on how to make easy cold process soap recipes, you can find my soapmaking tutorial and additional beginner soap recipes here.)
You will begin by making your lye solution. To do this, first measure out the water into a heat safe container. Then, using a digital scale, weigh out the lye called for in the recipe into a separate container. Slowly pour the lye into the water. Then mix until all of the lye has dissolved. Set aside in a safe location to cool.
While the lye-water solution cools, weigh out the soapmaking oils. Combine in a stainless steel pot and heat over low on the stove until all of the semi-soft oils have melted. Stir to combine, then remove from heat.
In the meantime, while waiting for the lye-water and oils to cool, weigh out the essential oils into a separate container.
Once your soapmaking oils and the lye water are within 10°F of one another and have cooled to around 90°F, you’re ready to make your first basic soap recipe!
For the sake of simplifying this recipe, you can go ahead and add the essential oils to the soapmaking oils at the beginning. If desired, you can also add a teaspoon of your favorite clay. Mix briefly with an immersion blender.
Then, slowly pour the lye-water into the soapmaking oils. Mix with an immersion blender again until you reach trace. You’ll know when your soap has reached trace when it looks similar to pudding. Additionally, when you drag your immersion blender through the top of the soap, it will leave a trail behind it that doesn’t fill in with soap once your remove the blender.
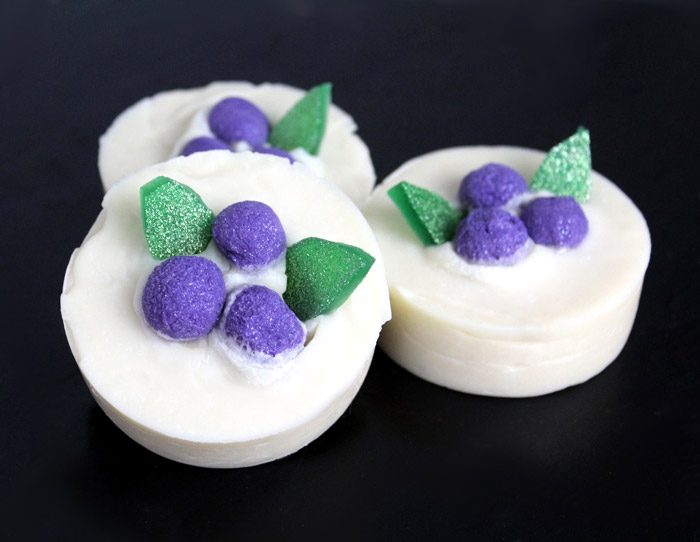
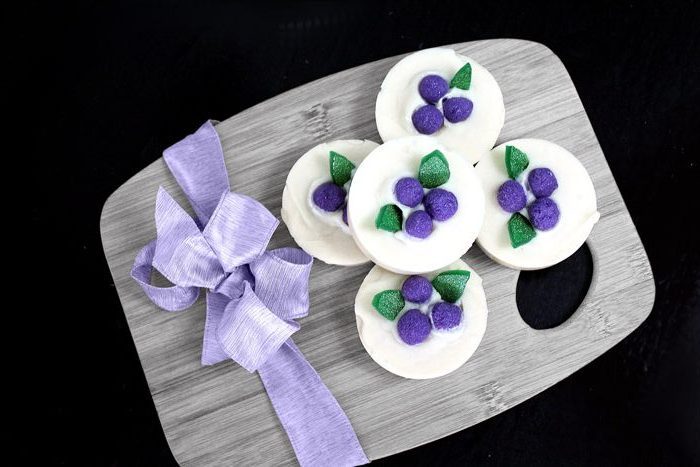
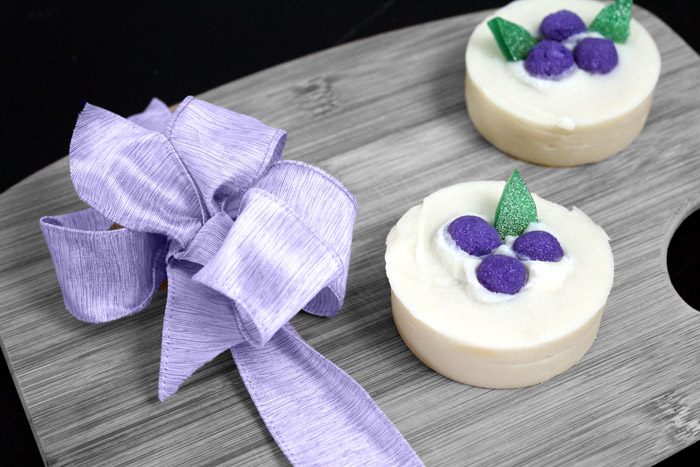
Now pour the soap batter into your mold of choice. I used a round silicone soap mold with cavities that were 3″ in diameter for a yield of six soap bars. (A 2.5″ diameter silicone soap mold would work as well.) Smooth the tops of the soap as desired.
Finally, cover the top of your soap, with parchment paper or plastic film. Then set your mold aside in safe location where it won’t be disturbed.
You should be able to unmold you soap 24 to 48 hours later. If you go to remove your soap but find that it’s still slightly soft, you can pop the mold into the freezer for about a half hour. Your soaps will then easily come out of the mold. (Alternately, you can also mix a teaspoon of salt into your soap when you add the essential oils for a bar that starts off slightly harder.)
All that’s left now is to allow your soaps to cure four to six weeks prior to use. Once cured, simply wrap and label your soaps as desired for personal use or seasonal handmade gifts!
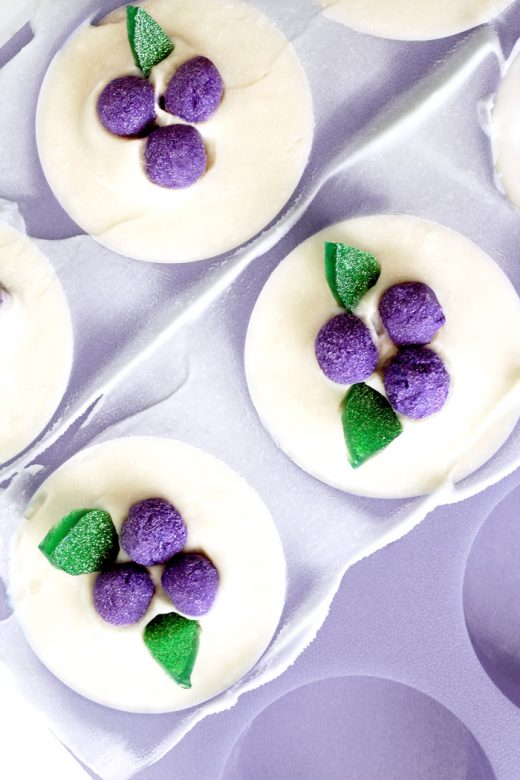
How to add embeds to my basic soap recipe
Creating embeds for your soaps is easy. I used a partial bar of soap from a previous soap recipe for the sparkling purple balls. I simply rolled the soap into balls when I unmolded the soap and saved them for my next recipe.
If you’d like to color your first batch of basic soap to make your own colored soap balls, simply add a teaspoon each of purple mica and/or superfine biodegradable glitter to the oils of my simple soap recipe, once cooled, along with the essential oils. Then, reserve one bar, once you unmold your soap to shape into soap balls. You can then use these balls for your next soapmaking adventure as embeds.
Alternately, you can also use melt and pour soap with a mini round silicone ice cube tray to make your embeds ahead of time when you make my easy soap recipe for the first time. Simply cube clear melt and pour soap and combine in a glass Pyrex measuring cup. Then heat in 20-30 second increments until melted. Remove from heat and add several drops of purple liquid soap colorant as desired. (You can also add a small amount of biodegradable glitter to suit.) Stir to combine, then pour the soap into the ice cube tray mold and allow to harden. Remove the soap balls once they have solidified.
For the leaves, simply mix a small amount of clear melt and pour soap. Then add several drops of green liquid soap colorant. (I also mixed in a bit of glitter with mine to make them more festive.) Mix to combine. Then pour a thin layer of the soap into a cavity of a rectangle silicone mold. Allow the soap to harden, then remove from the mold. Now simply use a pizza cutter, or a leaf shaped polymer clay cutter, to cut the soap into leaf like shapes.
To use your soap embeds, make my basic soap recipe as instructed above. Then, after pouring the soap into your mold, simply arrange three of the soap balls in the center of each bar. Press the soap balls about 1/3 of the way into the soap. Follow with the soap leaves, arranging one or two leaves as desired around the soap balls. Leave your soap bars uncovered until they’re ready to unmold. Then unmold as usual and allow to cure.
If you enjoyed my simple soap recipe, you can discover more of my cold process soapmaking recipes online. You can also follow me on G+, Pinterest, Facebook, Twitter, Blog Lovin’ and Instagram. Or simply subscribe to Soap Deli News via email for future updates, DIY projects and recipes.
Pin it for later
Maryam
Sunday 4th of August 2019
Hi, i want to make this soap but is there anything i can substitute for babassu, and secondly how do i roll the soap into balls after unmolding, wont the bar be hard ? Thanks for the recipe
Rebecca Dillon
Sunday 4th of August 2019
Common substitutions for babassu oil include Coconut Oil, Palm Kernel Oil and Murumuru Butter. You'd need to run everything back through a lye calculator though. Alternately you can try another oil of your choosing. Soapcalc.net will give you the final properties of the soap with the substitution as well as the changes to the amount of lye you'll need, if applicable. If you unmold your soap early before it firms up or are using a recipe that makes a softer bar of soap, you can usually pull off chunks and roll it into balls. It's needs to be done as soon as it's unmolded though before the excess water starts to evaporate.